Decoding the Red Hammer Candlestick: A Comprehensive Guide for Traders
The financial markets are a complex landscape, and understanding the various tools available to navigate them is crucial for success. Among these tools, candlestick patterns hold a prominent position, offering insights into potential price movements. One such pattern is the red hammer candlestick. This article provides a comprehensive guide to understanding the red hammer candlestick, its significance, and how traders can use it effectively. We’ll delve into its formation, interpretation, and limitations, ensuring you have a solid foundation for incorporating it into your trading strategy. The appearance of a **red hammer candlestick** can signal potential buying opportunities.
What is a Hammer Candlestick?
Before diving into the specifics of the red hammer, it’s essential to understand the general concept of a hammer candlestick. A hammer is a bullish reversal pattern that forms after a downtrend. It’s characterized by a small body near the high, a long lower shadow (or wick) that is at least twice the length of the body, and little or no upper shadow. The long lower shadow indicates that sellers initially pushed the price lower, but buyers stepped in and drove the price back up, closing near the high. This suggests a potential shift in momentum from bearish to bullish.
Understanding the Red Hammer Candlestick
The **red hammer candlestick** is simply a hammer candlestick where the body is red (or bearish). This means the closing price is lower than the opening price, albeit still near the high of the candle. While the color might seem to suggest continued bearishness, the underlying principle remains the same: the long lower shadow indicates strong buying pressure that overpowered the sellers, suggesting a potential trend reversal.
The color of the hammer (red or green) is less important than the overall shape and the context in which it appears. The long lower shadow is the key indicator of potential bullish reversal. A **red hammer candlestick** confirms the presence of buying pressure despite the initial selling.
Formation of a Red Hammer Candlestick
The formation of a **red hammer candlestick** unfolds as follows:
- The market is in a downtrend, indicating that sellers are in control.
- The price opens at a certain level.
- Sellers push the price significantly lower, creating a long lower shadow.
- Buyers step in and aggressively buy, driving the price back up towards the opening price.
- The price closes near the opening price, but slightly lower, resulting in a small red body.
The resulting candlestick resembles a hammer, hence the name. The long lower shadow represents the rejection of lower prices and the potential for a bullish reversal. Recognizing the **red hammer candlestick** is a skill honed with practice.
Interpreting the Red Hammer Candlestick
Interpreting the **red hammer candlestick** requires careful consideration of several factors:
- Preceding Trend: The hammer is most effective when it appears after a clear downtrend. The longer and more established the downtrend, the stronger the potential reversal signal.
- Confirmation: It’s crucial to wait for confirmation of the reversal. This typically comes in the form of a bullish candlestick on the following day, closing above the high of the hammer. Without confirmation, the hammer may simply be a temporary pause in the downtrend.
- Volume: Increased volume during the formation of the hammer and on the confirmation candle strengthens the signal. High volume indicates strong participation from buyers.
- Support Levels: The hammer is more significant if it forms near a known support level. This adds confluence to the signal, suggesting that buyers are defending the support level.
The **red hammer candlestick** appearing at a support level can be a powerful buy signal.
Trading Strategies Using the Red Hammer Candlestick
Here are some trading strategies that incorporate the **red hammer candlestick**:
- Entry: Enter a long position after confirmation of the hammer. This could be when the price breaks above the high of the hammer on the following day.
- Stop Loss: Place a stop-loss order below the low of the hammer. This limits your potential losses if the reversal fails.
- Target: Set a profit target based on technical analysis, such as resistance levels or Fibonacci extensions. Alternatively, you can use a risk-reward ratio to determine your target.
Remember to always use proper risk management techniques when trading the **red hammer candlestick** or any other pattern.
Examples of Red Hammer Candlestick in Trading
Let’s consider a hypothetical example. Imagine a stock has been in a consistent downtrend for several weeks. Suddenly, a **red hammer candlestick** appears near a previously established support level. The following day, the price gaps up and closes above the high of the hammer. This confirms the bullish reversal signal. A trader could enter a long position at the close of the confirmation candle, placing a stop-loss order below the low of the hammer. The profit target could be set at the next resistance level.
Another example might involve analyzing a currency pair. If a **red hammer candlestick** forms on the daily chart after a period of decline, and is followed by a strong bullish candle, traders might consider entering a long position. [See also: Understanding Forex Candlestick Patterns]
Limitations of the Red Hammer Candlestick
While the **red hammer candlestick** can be a valuable tool, it’s essential to be aware of its limitations:
- False Signals: Like any technical indicator, the hammer can generate false signals. It’s not a foolproof predictor of future price movements.
- Market Context: The effectiveness of the hammer depends on the overall market context. It’s more reliable in trending markets than in range-bound markets.
- Subjectivity: Identifying a hammer can be subjective. Different traders may have different interpretations of the pattern.
Always use the **red hammer candlestick** in conjunction with other technical indicators and fundamental analysis to increase your chances of success.
Hammer vs. Hanging Man
It’s important to distinguish the hammer from another similar candlestick pattern called the hanging man. The hanging man has the same shape as the hammer (small body, long lower shadow), but it appears after an uptrend, signaling a potential bearish reversal. The context in which the pattern appears is crucial in determining whether it’s a hammer or a hanging man.
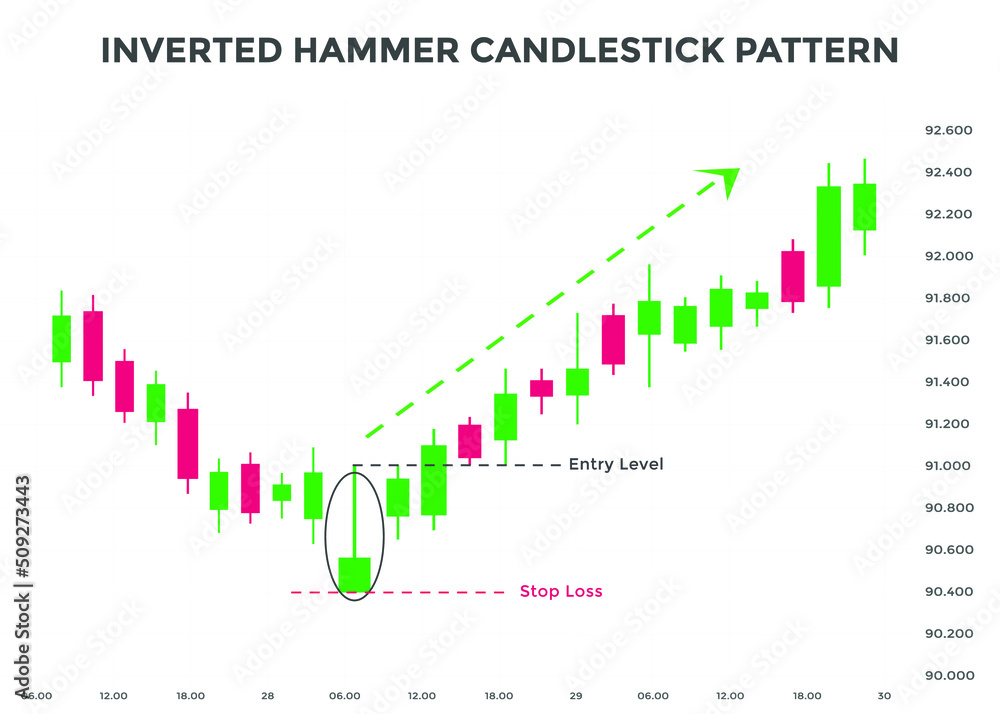
Hammer vs. Inverted Hammer
The inverted hammer is another variation. It features a small body at the bottom and a long upper shadow. It also signals a potential bullish reversal after a downtrend, but the upper shadow indicates that buyers tried to push the price higher, but were met with resistance. The **red hammer candlestick** is different because the buying pressure is sustained to bring the price close to the opening price.
Combining the Red Hammer Candlestick with Other Indicators
To increase the reliability of the **red hammer candlestick**, consider combining it with other technical indicators such as:
- Moving Averages: Look for the hammer to form near a moving average, which can act as a dynamic support level.
- Relative Strength Index (RSI): Check if the RSI is oversold when the hammer forms, which can further confirm the potential for a bullish reversal.
- MACD: Look for a bullish crossover on the MACD to coincide with the hammer, providing additional confirmation.
Using a combination of indicators can help filter out false signals and improve your trading accuracy. Understanding the **red hammer candlestick** in conjunction with other tools is key to successful trading.
Psychology Behind the Red Hammer Candlestick
The **red hammer candlestick** reflects a battle between buyers and sellers. The long lower shadow shows that sellers initially dominated, pushing the price down significantly. However, the strong buying pressure that followed indicates a shift in sentiment. Buyers stepped in aggressively, rejecting the lower prices and driving the price back up. This suggests that the market may be oversold and that buyers are ready to take control.
The Importance of Confirmation
As mentioned earlier, confirmation is crucial when trading the **red hammer candlestick**. Without confirmation, the hammer may simply be a temporary pause in the downtrend. Confirmation typically comes in the form of a bullish candlestick on the following day, closing above the high of the hammer. This confirms that buyers have indeed taken control and that the reversal is likely to continue. Waiting for confirmation significantly reduces the risk of entering a false trade.
Red Hammer Candlestick in Different Timeframes
The **red hammer candlestick** can be used on different timeframes, such as daily, weekly, or monthly charts. However, the reliability of the pattern may vary depending on the timeframe. Longer timeframes generally provide more reliable signals than shorter timeframes. A hammer on a weekly chart, for example, is likely to be more significant than a hammer on a 15-minute chart.
Conclusion
The **red hammer candlestick** is a valuable tool for traders looking to identify potential bullish reversals after a downtrend. By understanding its formation, interpretation, and limitations, traders can incorporate it into their trading strategies. Remember to always wait for confirmation, use proper risk management techniques, and combine the hammer with other technical indicators to increase your chances of success. Trading the **red hammer candlestick** effectively requires practice and patience. Mastering the art of identifying and interpreting candlestick patterns like the **red hammer candlestick** can significantly enhance your trading performance. The **red hammer candlestick** is a key pattern to watch for potential buying opportunities. By diligently studying and applying these concepts, you’ll be well-equipped to navigate the financial markets with greater confidence and precision. The appearance of a **red hammer candlestick** should always prompt further investigation and analysis. Finally, remember continuous learning and adapting your strategies based on market conditions are crucial for long-term success in trading. The **red hammer candlestick**, when properly understood, can be a powerful addition to your trading arsenal.
